How To Move a Greenhouse to a New Home

a woman walking out of a greenhouse carrying a bunch of flowers

Figuring out how to move a greenhouse is no small task — the delicate panels and bulky frame require careful handling. However, if you approach the process with a plan, prepare your site and foundation in advance, and protect all the components properly, it's possible to move your greenhouse without breaking the panels.

At HireAHelper, we've helped connect people with professional movers for over a decade, so we've seen successful moves of all kinds, including those with a greenhouse. This guide explains how to move a greenhouse, from choosing and preparing a site to dismantling and transporting the structure safely.


Last updated: Jun 30, 202611 min read
Melanie Morris
Written byMelanie Morris

Key Takeaways

  • Make sure your greenhouse is in good condition before moving it.
  • Choose and prepare the site before you move for faster assembly.
  • Photograph and label parts as you disassemble the greenhouse so nothing gets lost.
  • Use padding to protect panels in transit.
  • Reassemble the greenhouse quickly to reduce risk to your plants.
Melanie Morris
Author

Melanie Morris

Melanie Morris is an editor, writer, and one of the sharpest moving experts at HireAHelper. Seven years spent answering readers' toughest questions and demystifying a process most people dread has made her an authority on what movers actually need to know — and how to explain it without the jargon. Her own relocations around the Southwest and up and down the West Coast give her the firsthand experience to back it up. Whether you're crossing the country or just moving down the block, Melanie makes sure the advice you get is accurate, trustworthy, and easy to act on.

How To Move and Dismantle a Greenhouse: Step-by-Step

Moving a greenhouse is a big undertaking, so it's important to have a plan before you get started. Below, you can see each step of the process and learn what you need to do so your greenhouse arrives at your new home safely.

Step 1: Assess Your Greenhouse Type and Condition

Not all greenhouses can (or should) be moved. As you're deciding whether to move yours, consider these factors:

  • Portability: Greenhouses with open bottoms and lightweight frames are easy to disassemble and move. Models with solid foundations and fixed anchors are better off remaining at the original home.
  • Disassembly: It's easier to move a greenhouse that can be moved in sections.
  • Condition: If the greenhouse shows signs of rust, rot, brittleness (especially in plastic panels), or excessive wear and tear, it might not hold up well during the move.
  • Size: Small greenhouses are easier and cheaper to move.
  • Costs: Compare the moving and replacement costs. It might be more affordable to buy a new greenhouse than to transport the old one.
  • Age: The older a greenhouse gets, the more vulnerable it becomes.

The greenhouse material is another important consideration:

  • Polycarbonate: Polycarbonate models usually last for 10 to 20 years. If yours is at the upper end of this age range, you may be better off replacing it, especially if it's already worn or damaged. But the material is tough and durable, so it might be worth moving if it's newer.
  • Glass: These greenhouses are heavy and fragile, making them difficult to move. And if you're moving to a cold climate, the low insulation power might not be enough to protect your plants.
  • Plastic: Lightweight plastic greenhouses are relatively easy to move if you can avoid rips and tears. These models last for about 5-7 years.

Don't forget to check zoning permit laws in your new area! Make sure greenhouses are allowed at your new property and that yours doesn't exceed any size restrictions.

Step 2: Decide Where To Relocate Your Greenhouse

Before you start disassembling, decide where your greenhouse will go in your new home. Here's what to look for in a new spot:

  • Sunlight: Observe the sun's movement across your garden throughout the day to find a spot that gets plenty of sunlight. Pick a spot that's a safe distance from tall trees — they block direct sunlight, and falling branches pose a risk to the glass.
  • Drainage and ground conditions: Your greenhouse needs to be on level ground to avoid drainage problems, such as pooling water after irrigating your yard or heavy rain. If the ideal spot is on uneven ground, you'll have to level the land before you build.
  • Wind protection: Choose a place that's shielded from the wind, if possible. Alternatively, look for a place that supports strong anchors.
  • Access to water and utilities: Make sure your greenhouse is within reach of a garden hose and a power outlet for lights and fans.

Step 3: Prepare the New Greenhouse Site and Foundation

Once you've found the perfect spot for your greenhouse, it's time to prepare the area. Having the site ready in advance makes it a lot easier to set up the greenhouse after the move.

Here's how to prepare the site:

  • Clear the ground: Remove grass, weeds, and loose branches, and rake up leaves and other debris.
  • Measure and mark the area: Mark off the perimeter of your greenhouse.
  • Level the ground: Find the highest point of your site, and dig it out using a shovel. Move the dirt to the lowest point of the site. Spread the dirt out evenly and compact it with a vibrating plate (you can rent one if you don't have it). Use a level to make sure the whole area is flat.
  • Create drainage: Add a layer of gravel on top of your soil to allow easy drainage.
  • Prepare the foundation: You can pour a concrete pad, create an outer frame with pressure-treated wood, or use concrete footings.
  • Add anchors: Consider installing steel anchors into your concrete pad or footings. Alternatively, you can bolt the greenhouse to the wooden frame and add ground anchors for extra stability.

Step 4: Gather Tools and Packing Materials

There are numerous parts to a greenhouse, and you'll need various tools to carefully take them apart and pack them for your move. Here's a checklist of the basic items you'll need to dismantle a greenhouse:

For the Greenhouse Structure

  • Pair of pliers
  • Flat and crosshead screwdrivers
  • Adjustable wrench
  • A short ladder to reach the roof
  • Containers to gather brackets, clips, nuts, and bolts
  • Masking tape
  • Marker

For the Plants

  • Hand shovel
  • Burlap bags, plant pots, buckets, or trash bags
  • Extra potting soil

Personal Protective Equipment

  • Thick gloves
  • Safety glasses
  • Sturdy shoes or boots

Packing Materials

  • Bubble wrap, foam padding, and foam corners to safeguard fragile components, especially glass panes
  • A rope to secure everything

Step 5: Prepare and Clear the Greenhouse

Before you can take care of the greenhouse itself, you have to make sure your plants are safe and ready for the move. Follow these steps to ensure that everything goes smoothly:

  • Prepare plants: Changing a plant's environment, even temporarily, can cause distress. To make the journey easier on them, trim dying or surplus stems from any plants that need it.
  • Dig up your plants: Take care not to damage the roots when moving plants — use a hand shovel to dig a ring around the plant's main stem, following the roots' position in the drip line. That's the outer edge of a plant's foliage where water naturally drips down to the soil. Make sure you keep the soil around the roots intact.
  • Get plants ready for transport: Place plants in buckets, plant pots, or burlap bags for transport.
  • Pack small items: Pack up small, unsecured items like tools, heaters, and fertilizer bags.
  • Remove large items: Clear out heavier items like pots, shelves, and benches. You should also remove secured items like lighting and shades.
  • Disconnect utilities: Disconnect your greenhouse from water and electricity, and drain any remaining water from hoses and irrigation systems.

Step 6: Label and Document Every Component

As you're packing up your greenhouse, make detailed notes. Draw a rough sketch of the floor plan, and map out where each plant and piece of furniture goes. Include benches, shelves, lights, hanging pots, watering systems, tool racks, and heaters.

"If you're bringing any plants with you in your car or rental truck, you'll need to carefully map out your route before you hit the road and check with each state's Department of Agriculture to ensure your plants are allowed."

You should also create a labeling system to keep track of everything, but avoid adhesive labels — they fall off too easily in wet or dirty conditions. Instead, use plastic hang tags with paper inserts. Label your plants, benches, shelves, and anything else that might need to be disassembled during the move. If you need to remove screws, bolts, and other hardware pieces, place them in plastic bags.

Once the greenhouse is empty, take photos from different angles to document the structure. This process makes it easier to reassemble the greenhouse at your new home.

Make sure to pay special attention to areas that can be challenging to put back together:

  • Corners and joints
  • Roof connections
  • Door and vent placement
  • Heater and shelf attachments
  • Anchor points

Zoom in on any area that uses hardware. That way, you'll remember which bolts need washers and which don't.

Step 7: Remove Panels Safely
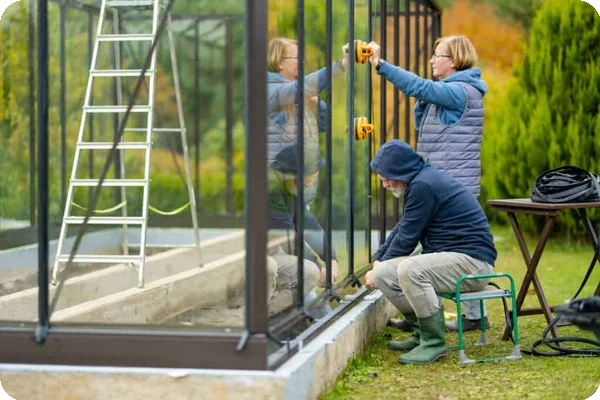
an older man and woman work on removing the glass from the side of a greenhouse

While it's possible to disassemble greenhouse panels yourself, it's not the best idea. It requires heavy lifting and time spent on a ladder, so a helper is always the safer option.

First, clear moss off the panel using dish soap and warm water. As you remove the panels from the roof, tackle one wall at a time. This way, you can use masking tape and a marker to label where they came from — north, south, east, or west walls, and the roof without much trouble. Clips, brackets, nuts, and bolts are easy to lose, so put them in a bucket or plastic bag immediately.

Each greenhouse uses a different type of panel, and here's how to handle the most common ones:

  • Glass: Wear thick gloves and safety glasses, and hold panels by the edges.
  • Polycarbonate panels: Take care not to bend panels too far. Place labels on the inside (non-UV-protected) surface.
  • Acrylic: Use lightweight gloves and wrap panels in soft cloth to prevent scratching.
  • Fiberglass: Wear sturdy gloves to prevent injuries. Stand panels vertically in a cool, dry place out of the sun until the move.
  • Polyethylene film: Handle the film carefully, avoiding sharp edges that could tear holes. Fold and store in a dry place.

When all the panels are removed, take the door off its hinges (or brackets, if it's a sliding door). Then, take off the roof vents.

Step 8: Disassemble the Frame

When you're left with just the greenhouse frame, try to keep as much of it intact as you can. So if your greenhouse is small enough to do so, consider keeping each wall or roof frame in one piece instead of detaching each beam. This will make reassembling it easier at your new home.

If you have to disassemble the entire frame, start at the top and work your way to the bottom. Put the hardware in a bag as you go and attach it to the correct section with tape. You should also mark each frame section with masking tape to label them, and use clear, directional language like "top right corner."

Much like panels, there are different frame types. Here's what to do for the most common materials:

  • Metal frames: Store large sections vertically, and use tape to keep multiple small pieces together.
  • Wooden frames: Keep a drill on hand to remove screws. Store sections in a dry spot before moving.
  • PVC: Store sections vertically or lying flat on an open surface. Try to leave the connectors attached to the pipes.
  • Galvanized steel: Keep steel frame sections in a dry, covered space. Angle them slightly to allow drainage.
  • Aluminum: Wipe off any moisture, and keep the frame pieces in a clean, dry spot. Store them lying flat to prevent bending.

Step 9: Pack and Protect Components

How you pack your panels depends on the material they're made of. If they're made of glass, you should be aware that it's not just bumps on the road that can break your greenhouse panels during transport — prolonged vibrations between the panes can also damage them. Wrap glass panels in bubble wrap and label with "Fragile – Glass."

Polycarbonate is 250 times stronger than glass, so you don't have to worry about breakage en route. You can place thinner sheets of packing paper between polycarbonate panes to shield them from scratches.

For frames, use bubble wrap or foam padding to protect the corners.

Step 10: Load and Transport the Greenhouse

a man and a woman check plants they've unloaded from a rented moving van

Once your greenhouse components are wrapped and protected, you can load them into the moving truck. Make sure you have plenty of space — greenhouses aren't small. You'll need to secure the panels and frame components to the moving truck to prevent them from shifting or breaking.

Planning to bring your plants too? Don't put them in the moving truck, where temperatures can swing wildly throughout the day. And if you're crossing state lines, make sure to check state law to find out what plants are banned. Some places, like Texas and Hawaii, have strict laws around plants being brought into the state.

How To Transport a Greenhouse

Transport is the riskiest part of learning how to move a greenhouse. It's not something that fits as easily as a couch or table into a moving truck, and there are a lot of delicate parts. But as long as you load components carefully and add plenty of padding, it's possible to get the structure safely to your new home.

Step 1: Consider Hiring Professional Movers

Because a greenhouse is so unwieldy, hiring professional movers to help with the heavy lifting is a good idea. They have experience lifting and securing all kinds of items, including greenhouses.

Here's the bad news, though: most moving companies won't transport potted plants with soil. They're delicate and messy, and if you're moving interstate, there are multiple state laws about transporting plants to take into account. However, you can still transport your plans in your own vehicle.

Step 2: Safely Load and Secure Greenhouse Parts

Stack greenhouse panels vertically or diagonally in the truck so that each pane is only bearing its own weight. Use rope to secure the panels to the truck so they don't shift or bounce during transport. You should tie down the frames separately to prevent them from tipping over and breaking the glass.

Step 3: Plan Your Route With Regulations in Mind

If you're bringing any plants with you in your car or rental truck, you'll need to carefully map out your route before you hit the road and check with each state's Department of Agriculture to ensure your plants are allowed. If you have any prohibited plants, you'll either have to go around that state or ship those plants by mail.

Step 4: Reassemble the Greenhouse

Once you make it to your new house, make a point to reassemble the greenhouse as soon as possible. That way, you can get your plants situated in their new home.

Here's an overview of the process:

  • Build the base: Assemble the base of your greenhouse, and anchor it securely to your foundation.
  • Assemble the frame: As you raise the walls, make sure the structure is level and square. This ensures that the panels will fit into their channels.
  • Install panels: Start adding the panels, working from the bottom up. You should install the roof panels last. Tighten the hardware to ensure that the structure is solid.
  • Add other components: Add the vents, and hang the door.
  • Bring in furniture: Install shelves, assemble benches and tables, and place everything in your greenhouse. Refer to your floor plan as necessary.
  • Repot plants: Transfer your plants to their containers, making sure to move carefully to avoid soil loss.
  • Connect equipment utilities: Install watering systems, lights, fans, and heaters. Connect them to water and electricity, and test each system.
  • Move in supplies: Bring in your tools and gardening supplies, and organize them in the new space.

7 Common Mistakes To Avoid When Moving a Greenhouse

Moving a greenhouse can be a time-consuming process, but it's worth doing correctly. When you're organized and prepared, you can protect your plants and your panels. Make your life a little easier by avoiding these common mistakes:

  1. Not labeling parts: If you don't label your components clearly, you could spend countless hours trying to figure out where everything is supposed to go.
  2. Rushing disassembly or reassembly: Rushing could lead to a host of problems, from missing parts to broken pieces.
  3. Building on uneven ground: Forgetting to level the ground before your greenhouse arrives could result in a lot of frustration. It can also leave your plants unprotected for longer.
  4. Handling and packing panels incorrectly: You can't be too careful when it comes to greenhouse panels. Give them plenty of cushion and protection so they don't shatter en route.
  5. Not organizing hardware: Keep all the pieces together in one place, like a covered plastic bin, so you don't lose them. Don't forget to label the container, too.
  6. Moving the greenhouse in one piece: Without its foundation, a greenhouse can shift and twist. If this happens in the back of a moving truck, you could end up with a pile of unusable parts.
  7. Forgetting to document: If you don't take photos of the greenhouse before disassembling it, you might have a hard time putting it back together.

How Much Does It Cost To Move a Greenhouse?

Moving a greenhouse can cost you between $300 and $1,000, depending on the size and the distance of your move. You'll need plenty of space in your moving truck, which means you might need to shell out for a bigger vehicle. Then, you need to think about the cost of fuel, packing materials, and building a new foundation.

"…[Avoid] adhesive labels — they fall off too easily in wet or dirty conditions. Instead, use plastic hang tags with paper inserts…"

Planning to hire a professional to do the job for you? You can expect to pay up to $800 for a full-service local move that includes loading, driving, and unloading, or $400 for just loading and unloading.

If your greenhouse is old, cheap, or damaged, the cost of moving a greenhouse might not be worth it. However, if you have a high-end model in great condition, you could save thousands by making the move.

If you have a green thumb, knowing how to move a greenhouse is a useful skill. But whether you manage the move on your own or bring in the pros, you can protect your plants and delicate greenhouse components by working gradually and staying organized.

Frequently Asked Questions

Recent Articles

An artist carefully packing brushes, paints, canvases, and art tools into protective boxes for a move

How to Pack Art Supplies for Moving

Packing

Packing an art studio can feel more complicated than packing the rest of the house. Instead of neatly shaped household items, you may be dealing with paints, delicate brushes, unfinished work, fragile ceramics, and... Read More

Mover packing a cardboard box during a move

How Long Does Professional Packing Take?

Packing

Professional packing can take anywhere from 2 hours for a small apartment to a full day or more for a larger home. The actual timeline depends on how much you own and how prepared you are when the crew arrives. In... Read More

Stack of cardboard moving boxes with bubble wrap and packing tape

Do Packers Bring Their Own Boxes and Supplies?

Packing

Packers do not always bring their own boxes, including when you book labor-only packing help directly or through HireAHelper. What supplies they bring depends on the type of packing service you choose. With... Read More

Toiletries and props arranged on a bathroom washbasin

How To Pack Bathroom Items for Moving

Packing

The bathroom can be tricky to pack. It’s one of the last rooms you get to because you use it regularly, and it’s filled with items that can break or spill, but there are techniques to make this area easier to move.... Read More

Woman keeping boots in a cardboard box at home

How to Pack Shoes for Moving: A Step-by-Step Guide (2026)

Packing

You might think shoes are easier to pack than glassware or your TV, but if you just throw them into a large bag without following the proper steps, you might end up with scuffed leather, bent heels, or a moldy pair... Read More

Patio furniture cleaned and wrapped for moving

How To Pack Patio Furniture for Moving

Packing

Patio furniture tends to be heavy, collect dirt from outside, and have irregular shapes that don’t fit well in standard boxes. But packing them for a move isn’t impossible with the right process. If you clean each... Read More